Installation of Family Tree: BD-FR-07
Product contents:
- Family tree divided into 8 parts (dimensions 190x150 cm) or 12 parts (dimensions 300x232 cm)
- 8 photo frames
- 4 individual birds
- 40 leaves of various sizes
Attaching Photos to the Frame:
- Before attaching a photo frame to the wall, attach the photo to the back of the frame.
- Remove the photo tape, then stick the photo onto the frame.
- After the photo is secured, place the white adhesive gum on the back of the frame and carefully press it against the wall.
Family tree Installation:
- Variants: The family tree comes in two sizes - 190x150 cm or 300x232 cm and you can select either the left or right variant:
- Left variant: Trunk positioned on the left.
- Right variant: Trunk positioned on the right.
- All parts (tree, photo frames, and birds) are packed in a protective wooden template. Carefully remove each piece by peeling off the yellow tape on the back.
- Placement is customizable: This guide provides a suggested layout shown in the illustration. All parts (except frames) come with pre-applied double-sided foam tape. Peel off the backing to stick each part to the wall.
- Planning and Measuring:
- Measure the wall area for the family tree installation. The assembled tree will measure 190x150 cm or 300x232 cm, depending on the variant.
- Width is measured from the farthest left to the farthest right points of the tree. Example: For the left variant, the width ranges from the leftmost leaf (below the swallow) to the rightmost leaf.
- Height is measured from the bottom of the trunk to the topmost leaf.
- Arranging the Parts:
- Before attaching parts, lay out the family tree on the floor to visualize the final arrangement. This will help identify the placement of each part.
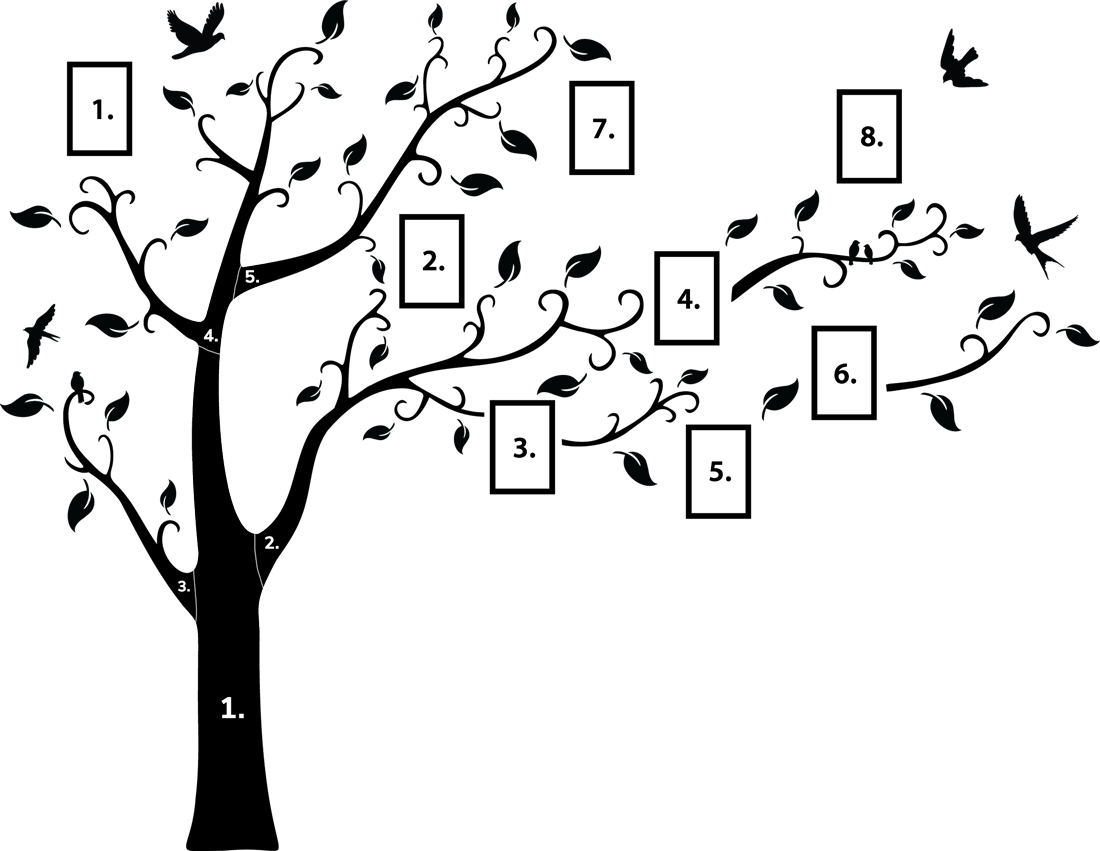
- Measure the trunk placement on the wall. As shown in the illustration, branches extend outward from the trunk. Attach the trunk first, as it serves as the base for all other parts. Example: For the left variant, leave a 32 cm gap from the left edge; for the right variant, leave 142 cm as indicated in the illustration.
- Important: Ensure accurate placement of the trunk, as the rest of the tree parts will align with it. Once adhered, parts are difficult to reposition.
- Attaching Tree Parts and Frames:
- Start by sticking the first few frames (numbers 3, 4, and 6) using the white adhesive gum provided.
- After placing frames 3, 4, and 6, attach the branches behind them.
- Finalizing the Installation:
- With the main framework in place, attach the remaining leaves, birds, and photo frames.
- The leaves vary in size and have a matching wood grain direction. If you want the wood grain to align across the tree, adjust each leaf to match the grain pattern of the main tree.
Illustrative Image of Family Tree Layout (Left Variant):
Refer to the illustration for a visual guide on part arrangement and spacing.
