


Types of Mountings
The assembly instructions for a specific product can always be found on the product page next to the description.
We offer you clear installation guides for our products on the wall. We divide them into two categories:
- General installation guide for DUBLEZ products on the wall - The complete wording is outlined in point no. 1.
- Installation of quotes and inscriptions on the wall - The installation process for these types of products is slightly different. Detailed description is in point no. 2.
- Installation of products with a hook
Note: When ordering and delivering goods, you will also receive the installation guide in paper form.
1. General wall mounting of products
This guide serves as a general instruction and recommendation for products that are designed for wall mounting. If you are unsure which type of mounting is suitable for you, we recommend finding the specific product on our website. The product description always mentions the recommended type of mounting.
Important note:
- Most products are packed in bubble wrap for safety.
- Furthermore, products are usually in a protective template made of the same material, which is taped to the product on the other side (where there is no decor). Carefully remove the tapes from the other side to safely remove the product (or all parts of the product) from the template.
- We do not recommend mounting the products on the wall if it involves freshly painted walls. We recommend waiting at least 2 weeks after painting to avoid insufficient adhesion of the product to the wall.
Types of mountings:
- Pre-applied foam adhesive tape - If your product has pre-applied foam tape on the back, the mounting is very straightforward. Foam tape is generally found on smaller product variants or on those whose lower weight allows for such mounting. Consider carefully where the product will be placed and then peel off the thin film on the foam tape. Then you can stick the product to the wall. Be careful to position the product straight! Once applied, it cannot be moved or repositioned.
- Non-pre-applied foam tape - For some products (usually smaller dimensions) you will receive foam tape in the package, which is not yet pre-applied to the product. Cut the tape to the required dimensions according to the product and stick it on strategic places on the back of the product. After applying, peel off the green film and stick it to the wall. After sticking, if you are sure of the placement on the wall, press down firmly.
- Adhesive putty - Adhesive putty squares are included with small products where it is not possible to place foam tape. Adhesive putty can be divided into smaller pieces, stretched as needed, etc. It serves to attach small and lightweight products to the wall. Do not use it on large products! After applying a sufficient amount of adhesive putty at several strategic points on the product, it must be pressed firmly to the wall.
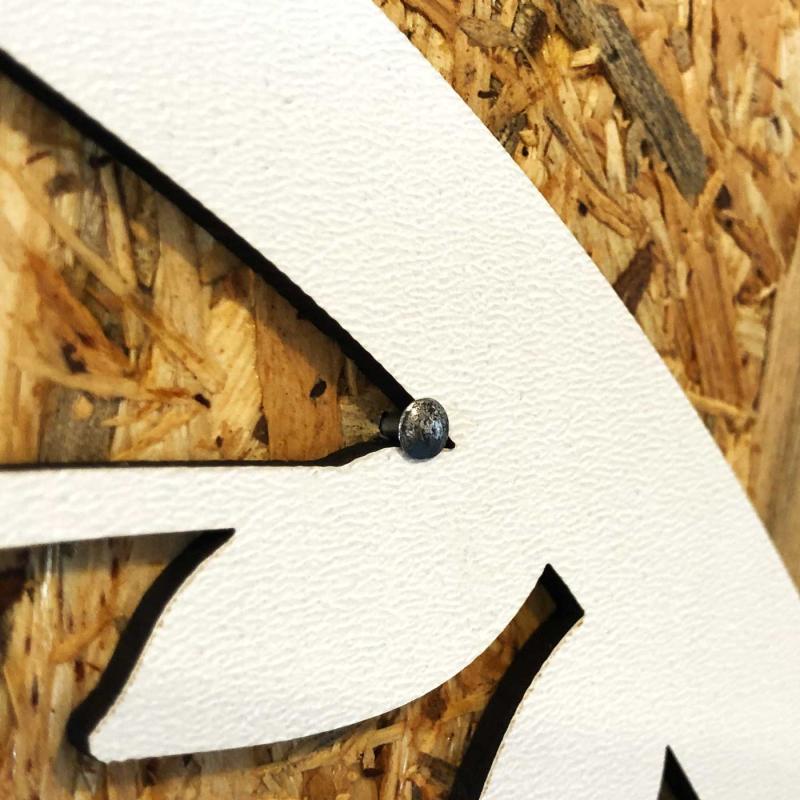
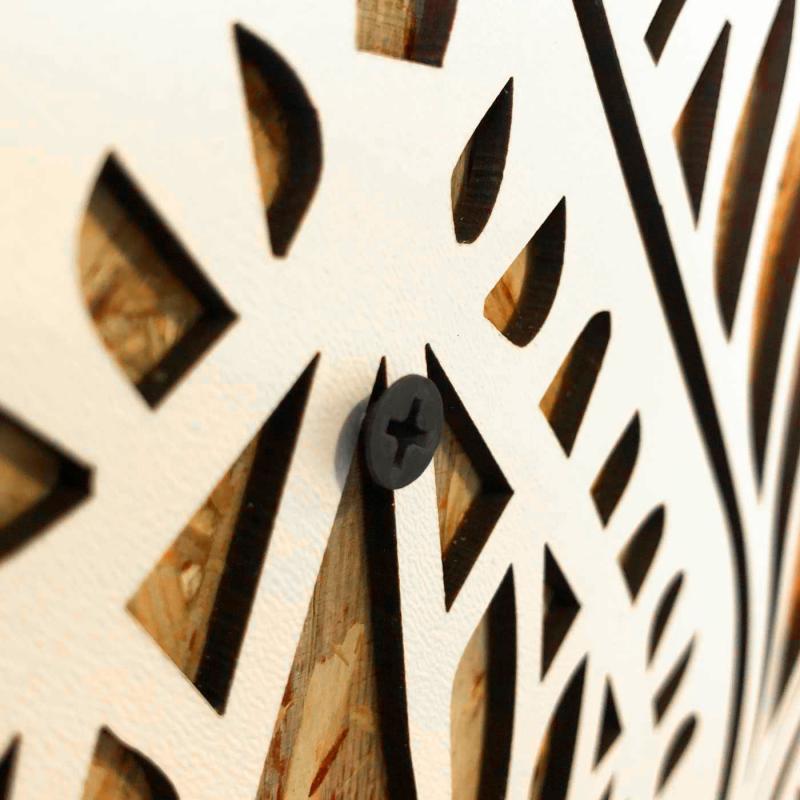
- Nails - For large products intended to be hung on the wall, we recommend using small nails (nails are not included with the product, they must be purchased). If you want the product flush against the wall, we recommend buying nails with a mini head. Thanks to the nail head, you can press the product flush against the wall.
- Assembly adhesive - There is also the option to use assembly adhesive (e.g., Mamut), but in this case, detaching from the wall later will be more difficult and may damage the plaster.
General installation gallery
2. Installation of a quote / inscription on the wall
On the back of the words and diacritics of the quote, there are already pre-applied foam squares / foam tape. They have a thin removable film under which is the adhesive foam that sticks to the wall.
Templates are also included with the individual parts of the quote (words, letters, diacritics). Thanks to the templates, you can stick the quote straight and correctly to the wall.
Procedure:
- First, consider and measure the place where you will be placing the quote.
- In the second step, place adhesive putty on the template, which you received in the package (adhesive putty squares). Place them on the template, (we recommend using two pieces per template, one on each side).
- Stick the template to the wall so that you can insert parts of the quote into it (do not press it too hard against the wall, so it can be removed easily). The template only serves to ensure that the quote is applied straight with the correct spacing. After all parts of the quote are applied in the template, you can safely remove the template. (once the quote is applied, it will no longer be possible to change or position it). In some cases, the templates may overlap. Some templates may have guiding lines (some quotes do not have any guiding lines at all). These can be either horizontal or vertical. Then, we recommend removing the templates only after all interconnected parts are applied.
- After all parts of the quote are applied in the template, you can carefully remove the template from the wall. We recommend proceeding carefully to avoid damaging the plaster.
- After removing the template, only the applied quote will remain on the wall.
- The foam tape that you stuck to the wall is very strong. The product will definitely not fall off the plaster. If you decide to remove the quote after some time, we recommend proceeding very carefully. It's best to first cut the foam off the wall from behind the product with a long sharp knife, and very carefully remove the remaining part that stays on the wall. Since there are several types of plasters, it is necessary to adapt to the structure and composition of yours.
Installation of a product with a hook
Some products have a pre-placed hook/hooks on the back side. In this case, the installation is very simple.
- If the product has one hook, it can be hung on any nail.
- Some products (usually larger ones) have two hooks on the back. In this case, we recommend measuring the nails where you will place the product beforehand (the distance between them and their level).
Note on wall installation
- The customer is responsible for the product installation - We are not responsible for any failures and detaching of the product from the wall. In many cases, quality placement depends on the composition of the plaster, perimeter and internal walls (wall temperature), and the correct installation procedure.
- Detaching products with foam adhesive tape - Since the foam adhesive tape is very strong, we recommend first cutting the foam from the product with a thin (preferably long for large products) knife from behind the product. Then, you can very carefully remove the remaining foam on the wall.
- Please, do not risk placing large products on adhesive putty and tape!