


3D DIY Wall Clock Sticker - Oraculum
 Walnut
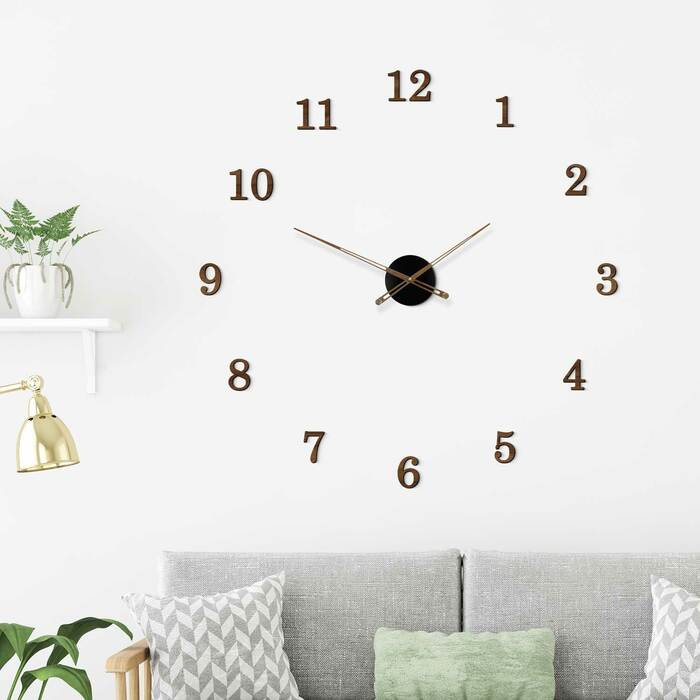

Plus a special Tree of Life worth 15€ on orders above 75€.
We ensure your products in order are safely packed during transport.
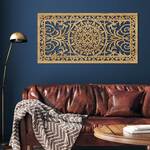
The Oraculum 3D wooden wall clock is a tasteful solution for stylish people looking for a unique decoration and clock in one. This designer clock is suitable for the kitchen or living room, where their oversized size will not escape any gaze.
We guarantee that you will fall in love with our wooden clock and it will become an unmissable decoration of every wall. Thanks to the silent operation of the mechanism, it is suitable to place the clock even in rooms where people sleep.
Main advantages of wooden clock:
- The clock serves as a design accessory
- Adhesive numbers available in several decors
- Oversized size after sticking
- The clock is made from wood
- The hands are made of quality walnut
- Silent operation of the mechanism
- Luxurious design
Note: When choosing a decor, you are choosing the decor of adhesive numbers. The color of the wooden hands and the steel cover is unchangeable.
Product installation:
We provide detailed installation instructions for the adhesive clock, where the hanging of the mechanism on the wall, the installation of the hands and the sticking of all parts of the clock on the wall are explained, along with a clear photo documentation step by step.
Technical information:
- The size of the clock after sticking on the wall is 100x100 cm
- The height of each number is 74 mm
- The size of the steel cover is 12 cm
- The clock only includes an hour and minute hand
- The clock is powered by a silent mechanism without ticking
- The mechanism is 16 mm thick. The distance of the clock from the wall after hanging will therefore be 16 mm
- The mechanism is powered by a standard AA battery with a voltage of 1.3 - 1.7 V
- AA battery is not included in the package
- 2-year warranty on the product
Package contents:
- 3D adhesive clock numbers with pre-applied foam tape
- Silent clock mechanism mounted in a black steel cover
- Wooden luxury hands made of solid walnut
- Clear product installation guide
Procedure:
- Measure the wall where you will be mounting the adhesive clock. The distance of the numbers or adhesive parts from the clock mechanism can be arbitrary, but we recommend using the dimensions on the wall where you originally ordered the clock. It is important to measure the center of the clock, as everything else will be based on that.
- The clock mechanism is already pre-mounted in a steel circular casing. On the back of the mechanism, there is also a hook for easy hanging on the wall.
- After successfully measuring the spot where we want to place the clock, we recommend placing a nail in the exact center (the exact center is the imaginary top part of the steel casing where the hook is located) and placing the clock mechanism with the casing on it.
- Included in the package is a piece of paper with a circle and 12 lines within it (a circular pie divided into 12 parts). There is a black dot in the center of the circle. Make a hole in the black dot. Slide this paper through the metal center of the clock until it stops, so that the paper touches the steel circular casing containing the clock mechanism. Once the paper is successfully placed on the casing, rotate it so that the lines in the circle are aligned like numbers on a clock.
- Also included in the package is a paper tape measure. Now, it is necessary to think about the distance of the adhesive parts from the center of the mechanism. For instance, if the dimension of the clock after being stuck on the wall is 150 cm, then the distance from the center will be half of this dimension (150 / 2 = 75 cm). Once we have this number thought out, we take the tape measure in our hands. Place its end (corner) at the center of the mechanism. When the longer side of the tape (1 meter long) overlaps with the line on the paper circle, we have the correct position and mark a dot on the wall at the distance from the center of the clock mechanism that we previously determined. In this way, we make 12 dots on the wall. As a result, all the dots will be at the same distance from the center.
- We now have 12 dots on the wall and the mechanism mounted on the wall (still without hands). Prepare all the adhesive parts of the clock, turn them to the other (back) side and remove the green protective film so that they can be stuck to the wall.
- Now start sticking the individual parts. Stick the corresponding part to each dot, centering the part approximately in the middle of the dot. Stick it very carefully, do not press too hard against the wall, to check from a distance at the end all the parts, how they are stuck on the wall and if it is necessary to slightly move some. Some clock numbers consist of two digits, such as 10, 11, 12. For these numbers, you will receive a template in the package. With this template, when you place it against the wall you can precisely stick the numbers to the wall with exact gaps between the digits.
- After we have stuck all the parts, we look from a sufficient distance to check if all the parts are stuck in the correct places and if they are stuck straight. If there was a mistake, carefully peel off the part and stick it back. If we are 100% sure of the correctness of the sticking, press all the parts firmly against the wall so that the adhesive foam properly adheres to the wall.
Installation of clock hands, battery into the mechanism, and setting the time:
- From the front side, where part of the mechanism protrudes from the casing, unscrew the small, top, brass screw located on the mechanism.
- Unpack the metal / wooden hands from the bag. The bag contains two hands. One is the hour hand (shorter) and the other is the minute hand (longer). The hour hand has a larger hole with a brass wheel inside it. The minute hand has a smaller hole without a brass wheel.
- On the hands there may be protective film. If it is present, carefully remove it from the hands.
- If you have black hands, the film is transparent.
- If you have silver hands, the film is blue or does not have a film.
- If you have metal gold or wooden hands, there is no film on the hands.
- Mounting the hands onto the mechanism:
- First, we will mount the hour hand. Insert the hand into the mechanism and gently push it in so that it holds firmly. Our tip: press around the perimeters, "semicircles," do not press the ends of the hands to avoid bending them.
- Next, insert the minute hand. This hand fits precisely into the groove on the mechanism.
- If we have successfully mounted both hands, then screw the brass screw back on top of the mechanism.
- Checking the hands: After mounting the hands, it is necessary to look at the clock from the side to see if the hands are crossing each other. If they happen to cross, gently bend the minute hand slightly (it is best to slightly bend it at the mechanism, not at the end of the hand).
- Choosing the correct battery for the clock: The clock mechanism is powered by a standard AA battery. To ensure that the clock functions properly and displays the correct time, it is very important to use the right type of battery. As a manufacturer we recommend using high-quality alkaline batteries from reputable manufacturers. We do not recommend using rechargeable batteries, old batteries, used batteries, or zinc-chloride batteries. The voltage of the battery should be within the range of 1.3 - 1.7 V. Failure to follow these recommendations may result in the clock not functioning properly.
- Installing the battery in the clock: Insert an AA battery into the clock mechanism. The direction of insertion (plus, minus) is shown on the mechanism.
- Setting the time: First, align the hands to show 12:00. Then, on the back of the mechanism, there is a black wheel, turning which you can set the correct time.
- If everything went smoothly, the mechanism in the steel casing can be re-hung on the wall using the steel hook, for example on a nail.
FAQ
An assembly manual is provided with every order.
The assembly instructions for a specific product can always be found on the product page next to the product description tab.
General wall mounting instructions for our products can be found HERE.
If you are interested in a size that is in between the ones we offer, please email us with your request at dublez@dublez.com . If you would like an even larger size than what is listed, also contact us via email. Our graphic department will assess whether it is possible to produce a different size.
All our products are manufactured in our DUBLEZ workshop in Slovakia (Europe). 95% of the materials we use for our products are produced in the EU, with nearly all coming from the Czech Republic/Slovakia. Products from our main material supplier meet the strictest standards enforced by the California Air Resources Board which applies stringent quality control conditions for air quality and pollutants. Additionally, the supplier's products are certified by the Programme for the Endorsement of Forest Certification (PEFC), and the wood used for these products comes from verified and well-managed forests, ensuring a renewable and sustainable source.
It is possible to detect a certain smell or odor from our products upon unpacking. Some may find this smell pleasant, while others may not. It is an aroma that results from the manufacturing process. The smell will naturally dissipate within 10 days of unpacking.
The foam tape you applied to the wall is very strong. The product will definitely not fall off the plaster. If you decide to remove the sign after some time, we recommend proceeding very carefully. Ideally, it would be best to first cut the foam from the wall with a long sharp knife from behind the product, and then carefully peel off the remainder that stays on the wall. Since there are various types of plasters, it is necessary to also adapt to the structure and composition of yours.
Since we manufacture products from wooden materials, the answer is debatable. If the product is not directly exposed to rain or splashing water, it should not be a problem. However, it is necessary to consider the varying humidity of the outdoor air and temperature. As wood is a living material, these fluctuations can cause, for example, slight bending of the material. Therefore, in such cases, we recommend mounting the product on the wall with small-headed nails. Thanks to the nail heads, the product will be securely pressed against the wall, ensuring its stability. The number of nails depends on the product.
Almost all of our products feature a small, subtle logo of our company. The logo is tiny and not very noticeable. If you would like to remove the logo nonetheless, so that it is not engraved on the product, it is possible. You will need to inform us in advance so that we can add this service to your order.
You can add this service through the following link HERE.
Yes, we safely package our products to ensure they arrive in good condition. Most products are placed in a protective template, and all products are further wrapped in bubble wrap. They are delivered in sturdy cardboard made from 5-layer corrugated board.
In most cases, damage is caused by the shipping company. You can leave the claim process with the carrier to us; we will handle everything on our behalf. To initiate the claim process with the carrier, we will need you to send photo documentation of the package to the email dublez@dublez.com, including:
- Detail of the damage/damages.
- Photograph of the entire product (if possible, including the template and it can also show bubble wrap in the background to make it clear to the carrier that the product was safely packaged).
- Photograph of the cardboard box from both sides. If the product arrived damaged, the damage is usually visible on the box as well.
It is possible that most of our products are received in a protective wooden template made of the same material as the product. This template is attached to the product with paper adhesive tape on the back. After peeling off the paper tape, you can easily remove the product from the template. The template serves to safely transport the goods to you, to prevent damage to the product. The template is packaging material and is not part of the product itself. Damage to the template cannot be considered as a claim against the goods, as it is packaging material and serves only for the safe delivery of the goods.
Since the products are made to order, once the order is placed, they are scheduled for production. The speed of scheduling depends on the selected shipping method. The delivery time is approximate and may be shorter or longer. In case of an extended order processing time, we will promptly inform the customer.
On the product page, you can see the nearest delivery date. This date is valid if the "Express Delivery" option is chosen.
All types of shipping along with their delivery times can be found HERE.
All products are placed in the production queue the moment the order is sent. The material required for production is always in stock. On the product page, you can see the nearest delivery date. This date is valid if the "Express Delivery" option is chosen.
All types of shipping along with their delivery times can be found HERE.
After selecting the decor and size, you need to Add the product to the cart. The shopping cart is located on the page at the top right. You then need to fill in: email address, billing and shipping details, choose a shipping method and payment method. Finally, just send the order.
If you still have trouble ordering, it is possible that you made a mistake in one of the steps of the shopping process. In this case, we recommend reading the guide on how to order. The guide advises the customer "step by step". If you still have issues with purchasing, please contact our customer support.
If you did not receive a confirmation email when sending the order or if you are not receiving emails related to order changes, one of the following scenarios may have occurred:
- Your email was sent to spam - In this case, it is necessary to check the "spam" or "junk mail" folder. With G-mail and other email providers, it can happen that the provider marks the email as spam.
- The email address entered in the order is incorrectly written - When sending an order, it is important that the email address filled out is valid. In this case, we recommend contacting our customer support, where we can change the email to the correct one and you will also receive an email with the order.
- Your email inbox is full - If your email inbox is full, it is not possible to receive new emails, including emails from us. To be able to receive emails, it is necessary to free up space in the email inbox, e.g., by deleting older emails.
- You did not send the order - If the order was not sent at checkout with the button used to send the order and you were not redirected to a thank you screen, it is likely that the order was not sent. In this case, we also recommend contacting customer support.